So in my previous post I explained how I came across this great idea on Pinterest, and decided to do a mash up of my own, and also how I came across all the materials for the project. Just as a recap:
- large wooden (empty) picture frame --- $3.40
- a piece of siding ------------------------- $0.54
- screen to go inside the frame ---------- $6.47
- shower hooks (previously owned) ------ $0.00
Which brings the total cost to --------------- $10.41
Not bad, not bad. Also, remember that I only ended up using about .50 cents worth of the screen, which I have another use for already, so it turned out not so bad. You could definitely go cheaper if you only get as much as you need. Plus this turned out much bigger than any I've seen for sale in Claire's or other places like that, which retail from $10 to $15 a pop. So I'd say we got ourselves a good deal.
Alright, now it's about to get messy.
First off, I gathered all my supplies together. You can see here that the wood of the side paneling matches pretty well with the frame, which is what I was going for, so that's a good sign.
Next, I had to determine how I was going to use the hooks. The way they were made, they ended up being sort of backwards for how I needed them. It appeared that the metal part was just super duper glued into the back of the plastic, seen below.
So, my first thought was that I could bend the horizontal piece that attached to the plastic, up, to make one vertical piece that I could then attach to the siding. In my head, I wanted the flower above the hook. So, with the help of my brother in law Jimmy, we set to it. Unfortunately, the hook couldn't really stand all the pressure being forced on it, and snapped in the bending process.....
So, on to plan B. I somehow managed to grab the metal right at the base (nearest the plastic) and pull it every which way until I heard the cracking of the glue. Then, with a little pressure and pulling and twisting, it popped right out! Victory!
And so, with those two 'samples' to the side, I started in on the main part. Borrowing my brother in law's handy dandy saw below, I went after that side panel.
Firstly, I laid the panel board across the back of the frame, marking where I wanted the cut. And then I got to sawing. It cut pretty easily, and fit perfectly within the back of the frame. You can see that I used tissue paper of all things (hey, it was right there when I needed it!) to do the cutting over. Since we were inside an apartment, it made clean up much faster.


With that step done, I needed to finish separating all the hooks from their plastic attachments. Using a pair of pliers/wire cutters, I proceeded to duplicate what I had accomplished with the successful sample above. I was aiming for 5 or 6 hooks to fit along the bottom of the board, and I had only 8 hooks, so I knew I had to be careful. Unfortunately, one of those 8 was the first disastrous sample, so I'd be cutting it pretty close. So just to summarize, I will tell you that all 5 made it, with 1 to spare. But it wasn't exactly perfect. Out of those 5, only 1 more actually popped out like I had hoped it would. The other 3, to my utter dismay, basically shattered under the pressure.
But, thanks to the help of some amazingly awesome Modge Podge that I had handy, they all fit back together literally seamlessly. You can see in the picture below the white of the Modge Podge from my generous application, just to be safe. But it dried clear, so now you can't even tell it was broken.
So, with some of those pieces drying, and the hooks all detached, I now had to attach them to that side panel board. First, I tried to eyeball how many I actually wanted on there. I decided, as you know, 5. I then decided how far down I wanted them to be, which you can see below. You'll notice that the far right hook is laying down since it's not attached yet, and the left one is being held up by your's truly so that I can see how it'll actually look.
And so now that I knew how it'd look, I got out the hot glue gun to start warming up while I measured.
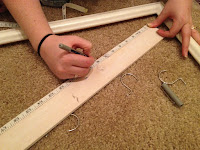
Measuring, you ask? Yep. Have I mentioned I'm a Type A? So this had to be spot on. After measuring the entire length of the board and subtracting from both ends what would be covered by the frame, I made 5 evenly spaced marks along the back with a pen.
Then, just to get a good visual, I laid the plastic pieces from earlier above the marks so that I could see what it would look like. After I was sure that it looked just right, I started the process of attaching the hooks.
First (and please excuse my Modge Podge covered fingers) I lined up a hook on the mark, across the bottom of the board. You can see that it hangs over a little on both sides, so I just pulled it forward (towards the side that would be showing) until it caught on the small ledge that you can see on the hook. No wonder they were so hard to get out of those plastic pieces!
Then, I put a big ole dab of glue in the area that the hook would be, and pressed the hook down into it, again pulling it forward to catch on that lege.
The trickiest part was definitely making sure that the hooks weren't going crooked when you looked at the board like it would be hanging up. After each was glued down, I went back just for good measure and glued over the top of each hook where it was attached.
And, voila. It was all done.
The next step was pretty easy. I just took the plastic pieces and laid them out across the board, above the hooks. Then lifting each one, I placed a small dot of hot glue on the board and pressed the piece into it. I could have easily used more glue, but I wanted to use less so that if I ever needed to change how it looked to match my room, I could easily pop the pieces off and replace them. Eh, eh? I know, pretty smart.


And now for the screen. It was pretty simple. I unrolled a bit, laid my frame over it, and cut it. Done. It was easy to follow the lines on the screen to make a nice clean cut. I cut a little extra around the edges just in case. No one would see the back, anyway.
And next, I attached the pretty-fied siding board onto the frame. It was a little tricky just because of the ledge on the top and bottom of the board, but I ended up just attaching a good amount of hot glue to the ledges and pressing them into the back of the frame. You can see that I left space for the hooks to not be hitting the bottom of the frame. Plus, I liked it a little elevated like that.
Finally, I attached the screen to the frame. Now be sure that in this process, you're pulling the screen pretty tightly across the frame. It's ok to have a little slack, but too much and the earrings will make the whole thing sag. Instead of stopping once I reached the board, I decided to just go all the way down with it. Why waste good space? I know there are plenty of earrings that can hang in between those hooks!
Now, because I'm keeping it real, I will be honest and tell you that we ran out of hot glue. I know, should have checked supplies in advance. So I attempted to use just a stapler to attach it.
I was really afraid that the pressure of the stapler onto the tiny ledge of that frame would make it crack, but it actually held pretty well. I wouldn't suggest it, though. After stapling down about half way, I decided to just wait until I got more glue sticks and finish it then, just to be safe. Oh and by the way, the best method I found with the glue was to lay down a good line across the ledge of the frame, and then press the screen down into it, going back across the top for added security if you want. But make sure you have something to use to press the screen down into the glue, cause that stuff gets H O T !
It also works pretty well to just stretch the screen out and lay hot glue OVER the screen. It goes through, and sticks pretty well that way, too. Just don't linger with the hot glue gun, or your screen will melt :(
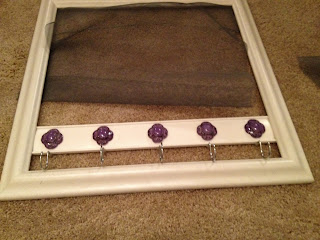
So, there you have it. Your own pretty jewelry holder. Now in all honesty, I haven't completely finished it, and definitely haven't loaded jewelry into it yet. I'm hoping to get that done this weekend sometime. But here's what it will look like once it's all done.
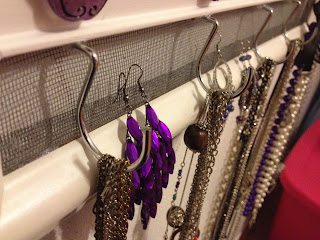
Earrings through the screening and necklaces from the hooks. I'm pretty excited about it.
Let me know what you think!
***UPDATE!!!! Here it is hung up with some jewelry on it:
And golly no, that is not anywhere NEAR my entire collection!
See? Told you I could fit earrings in between those hooks. It works well for the larger ones I own.


2 comments:
Cute!! Nice job =)
Thanks! :)
Post a Comment